The Imperial royal guard, or the Imperial Commando, was a group of clone commandos affiliated with the Advanced Science Division that were stationed on the Galactic Empire's research complex on Mount Tantiss on the planet Wayland.
Description[]
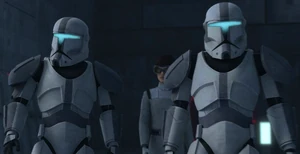
Imperial royal guards were clone commandos stationed on Wayland.
The Imperial royal guard,[3] otherwise known as the Imperial Commando, was a unit of clone commandos[4] that served in the Galactic Empire during the early years of its reign.[2] The guard was located in Tantiss Base on Mount Tantiss, home of the Imperial cloning program.[2]
The commandos wore white Katarn-class Commando Armor that sported grey markings on their helmets, chest armor, shoulder armor, and leg armor.[2] Their unit emblem, an upside down triangle with a cutout of a circle with two exits was placed on their right shoulder.[3] They were equipped with DC-15A blaster carbines and DC-17m Interchangeable Weapon Systems.[5]
History[]
Receiving Nala Se[]
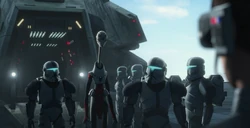
Imperial royal guards escorted Doctor Nala Se to Mount Tantiss on Wayland.
Following the conclusion of the Empire's operation on Kamino sometime in 19 BBY, which resulted in information, supplies, troopers, and scientific personnel being removed from Tipoca City and the city's subsequent destruction along with other Kaminoan cities, Kaminoan Chief Medical Scientist Nala Se was transported on a Rho-class transport shuttle to the Mount Tantiss research facility[2] on the planet[6] Wayland.[3]
On arrival, Nala Se was received by eight Imperial royal guard clone commandos, four on each side of the shuttle, and was escorted outside by two others. Nala Se was then welcomed by a medical officer Scalder of the cloning program[2][5] who also served as the facility's administrator.[3] The officer was escorted by another two commandos, who after Nala Se was greeted by the officer, escorted the two scientists inside along side the pair of commandos that escorted Nala Se.[2]
Transport 904 incident[]
- "We lost communication with transport 904."
- ―Emerie Karr, to Royce Hemlock
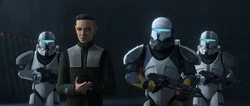
Clone Commander Scorch served with the Imperial royal guard under the authority of Doctor Royce Hemlock.
Around 18 BBY,[7] over a year after the destruction of Kamino, the Imperial royal guard continued to garrison the Wayland facility on Mount Tantiss along with dozens of other Imperial clone commandos. When Doctor Royce Hemlock arrived on Tantiss to assume control over Imperial cloning operations, he was received and escorted by several royal guards. When transport 904, an Imperial vessel affiliated with the cloning operation went missing along with its asset, a cloned juvenile Zillo Beast, several members of the royal guard were dispatched as part of a task force to recapture the beast. After the beast had been incapacitated with an ion cannon and captured, several members of the royal guard observed as the creature was put into stasis.[5]
Attack in the Balmorra system[]
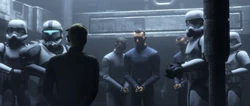
The Imperial royal guard was involved with transporting dissident clones to Wayland.
Later that year, numerous Imperial royal guard commandos were stationed at an Imperial installation on the planet of Balmorra. Under the command of Captain Pearce, one commando boarded a Gozanti-class cruiser along with a unit of TK stormtroopers in order to transport three dissident former clone troopers to the Wayland facility. As the vessel left Balmorra and prepared to jumped into hyperspace, it was ambushed and disabled by a ship belonging to defected Clone Captain Rex and his resistance network,[8] the Clone Underground,[9] and was boarded by the rogue clones, who utilized a leech vessel. As Captain Pearce realized that his forces would ultimately be overwhelmed, he ordered the royal guard commando to erase the ship's databank to prevent its information from falling into the invaders' possession. Before the commando could complete his task, the rogue clones entered the bridge and stunned the commando unconscious. After extracting what information remained, the rogue clones fled the Gozanti-class cruiser as responding Imperial Alpha-3 Nimbus-class V-wing starfighters strafed and destroyed the ship.[8]
Concurrently, Crosshair, who was being held prisoner at the Wayland facility, escaped his confinement as he was being interrogated. After having stumbled through the facility's corridors and dispatching squads of TK stormtroopers in his way, Crosshair accessed a satellite through Terminal 3 and sent a distress signal to his former squad, warning them that the Empire was searching for them. Nearby, a royal guard commando and a TK stormtrooper noticed that an unauthorized transmission had been sent out, with the commando ordering the connection to be severed and the terminal to be sealed. As terminal three flooded with a toxin that knocked Crosshair unconscious, Doctor Hemlock and a royal guard commando entered the room to retrieve him.[8]
Capture of Omega[]
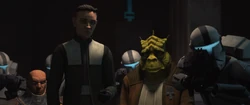
Doctor Hemlock and the Imperial royal guards tracked Clone Force 99 in order to capture a clone known as Omega.
Having been tipped off by the information broker Ciddarin Scaleback that the rogue clones of Clone Force 99 were seeking refuge in her parlor after a disastrous mission, the Imperial Advanced Science Division deployed a contingent of royal guard commandos to Ord Mantell. Doctor Hemlock personally led the commandos in the raid on Scaleback's parlor, with the intention of capturing the rogue clone Omega in order to coerce Nala Se into working for the Advanced Science Division. The commandos breached the parlor and immediately subdued the rogue clone Wrecker, and held him at gunpoint as Hemlock threatened the renegade squad's leader, Hunter, to lower his blaster and surrender, in which he eventually did. As Hemlock and the royal guard commandos escorted Hunter and Wrecker through the streets of Ord Mantell, they were suddenly ambushed by Omega herself.[10]
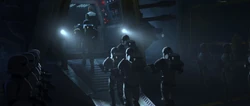
The Imperial royal guard captured Omega with the help of Clone Commander Scorch.
After being stalled by Hemlock, Omega was stunned and captured by Clone Commander Scorch. While Omega boarded a Nu-class attack/transport shuttle with Hemlock and Scorch, Hunter and Wrecker were escorted to a Low Altitude Assault Transport by a group of royal guard commandos. Before they could be shipped off-world, renegade clone Echo ambushed the Imperials with a captured AT-AC walker, buying time for his squad mates to break free of their bindings and dispatch the Imperial clone commandos.[10]
Later on, Hemlock arrived back on Mount Tantiss with Omega in tow, and finally convinced Nala Se to begin working for the Empire. As Omega was escorted inside the Wayland facility, she entered a laboratory guarded by two royal guard commandos where she would find Crosshair strapped down and unconscious.[10]
Appearances[]
 Star Wars: The Bad Batch — "Kamino Lost" (First appearance)
 Star Wars: The Bad Batch — "Metamorphosis"
 Star Wars: The Bad Batch — "Tipping Point"
 Star Wars: The Bad Batch — "Plan 99"
 Star Wars: The Bad Batch — "Confined"
 Star Wars: The Bad Batch — "Shadows of Tantiss"
 Star Wars: The Bad Batch — "Point of No Return"
 Star Wars: The Bad Batch — "The Cavalry Has Arrived"
Sources[]
 "Kamino Lost" Episode Guide | The Bad Batch on StarWars.com (backup link) (First identified as Imperial royal guard)
 Sixth Scale Figures (Pack: Imperial Commando) (backup link) (First identified as Imperial Commando)
Notes and references[]
- ↑
 Clone Commander Scorch in the Databank (backup link)
- ↑ 2.00 2.01 2.02 2.03 2.04 2.05 2.06 2.07 2.08 2.09 2.10
 Star Wars: The Bad Batch — "Kamino Lost"
- ↑ 3.0 3.1 3.2 3.3
 "Kamino Lost" Episode Guide | The Bad Batch on StarWars.com (backup link)
- ↑
 Sixth Scale Figures (Pack: Imperial Commando) (backup link)
- ↑ 5.0 5.1 5.2 5.3
 Star Wars: The Bad Batch — "Metamorphosis"
- ↑ Vader Immortal: A Star Wars VR Series – Episode I
- ↑ Per the reasoning here, the seventh and eighth episodes of The Bad Batch Season 2, "The Clone Conspiracy" and "Truth and Consequences," can be placed in 18 BBY. Therefore, all Season 2 episodes proceeding "The Clone Conspiracy" occur between 19 BBY, which features the end of The Bad Batch Season 1 according to Star Wars: Timelines, and 18 BBY. The Galactic Empire, the formation of which Star Wars: Timelines dates to 19 BBY, sent Mayday's squad to Barton IV over a year prior to the events of the twelfth episode, "The Outpost." As it occurs over a year into the Imperial Era and is set shortly after the events of "Truth and Consequences," the events of "The Outpost" occur around 18 BBY. Following that logic, the ninth through eleventh episodes ("The Crossing" through "Metamorphosis") are also set around 18 BBY because they occur between the events of "Truth and Consequences" and "The Outpost." Finally, all season 2 episodes set after "The Outpost" occur shortly after its events, thereby placing those episodes around 18 BBY as well.
- ↑ 8.0 8.1 8.2
 Star Wars: The Bad Batch — "Tipping Point"
- ↑ Star Wars: Dawn of Rebellion: The Visual Guide
- ↑ 10.0 10.1 10.2
 Star Wars: The Bad Batch — "Plan 99"

